Knowledge

Quick overview
1. Applicable products
2. Master board
Hilscher CIFX 50-RE (PC board, EtherCAT Master)
3. Configuration software
SYCON.net
4. Core procedure
Import XML → Add CIFX board → scan for slaves → master/slave configuration → download configuration → status monitoring → data exchange test
5. Key prerequisites
The slave must be powered up first and connected to the port on the CIFX board nearest the indicator via an Ethernet cable
6. Key notes
Any modification in SYCON.net only takes effect after it is downloaded to the board.
EC5R-1616B is a Solidot 5-series integrated I/O module that provides 16 DI (NPN/PNP compatible) and 16 DO (PNP). When it is connected as an EtherCAT Slave to a Hilscher CIFX 50-RE master board, it must be configured in SYCON.net and the configuration must be downloaded to the board before data exchange can be established.
What steps are required to complete the above communication? From importing the ESI file (.xml), adding the CIFX master, and scanning for slaves, to master/slave parameter configuration, downloading the configuration, and finally status monitoring and data exchange testing, every step is closely linked — in particular, any modification in SYCON.net only takes effect after it is downloaded to the board. This article uses the EC5R-1616B as an example to demonstrate the complete configuration procedure in SYCON.net.
Test environment
Controller model | CIFX 50-RE (EC board) |
5-series module model | (EcatTerminal-EC5R_V1.0.7_UINT) |
Configuration software | SYCON.net |
Network topology
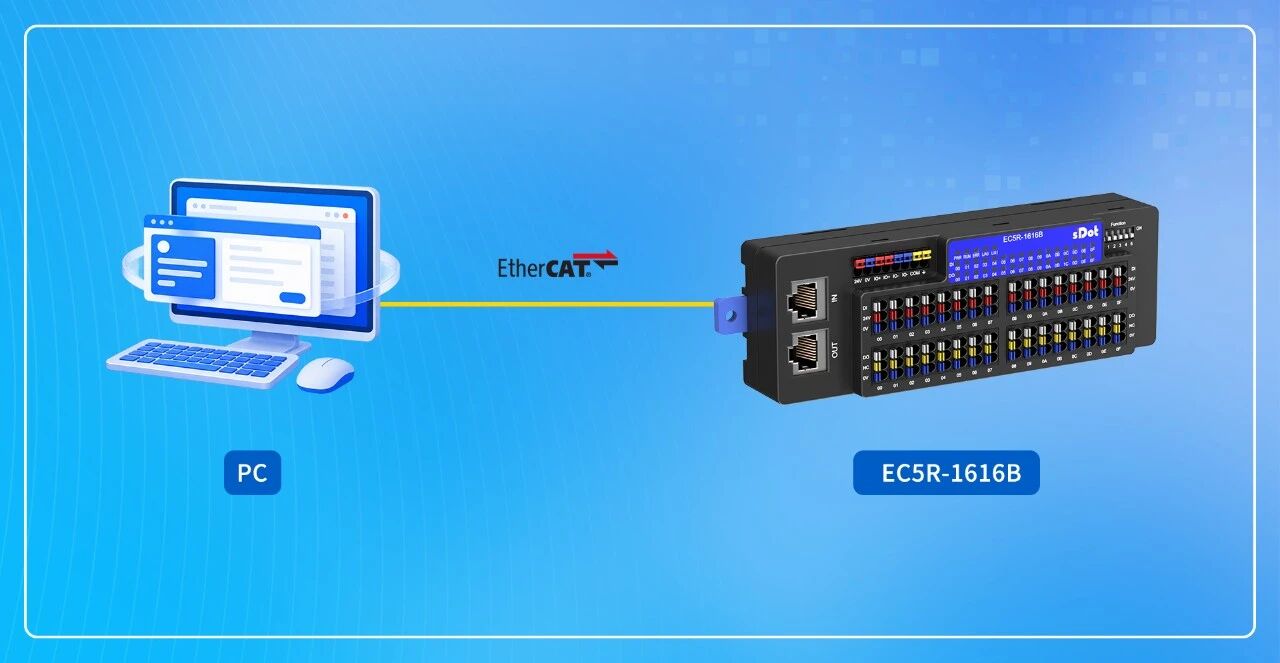
The host computer uses a Hilscher CIFX 50-RE board as the EtherCAT Master and connects to the EC5R-1616B module via the EtherCAT bus to form the test network.
Configuration in SYCON.net
1. Import XML
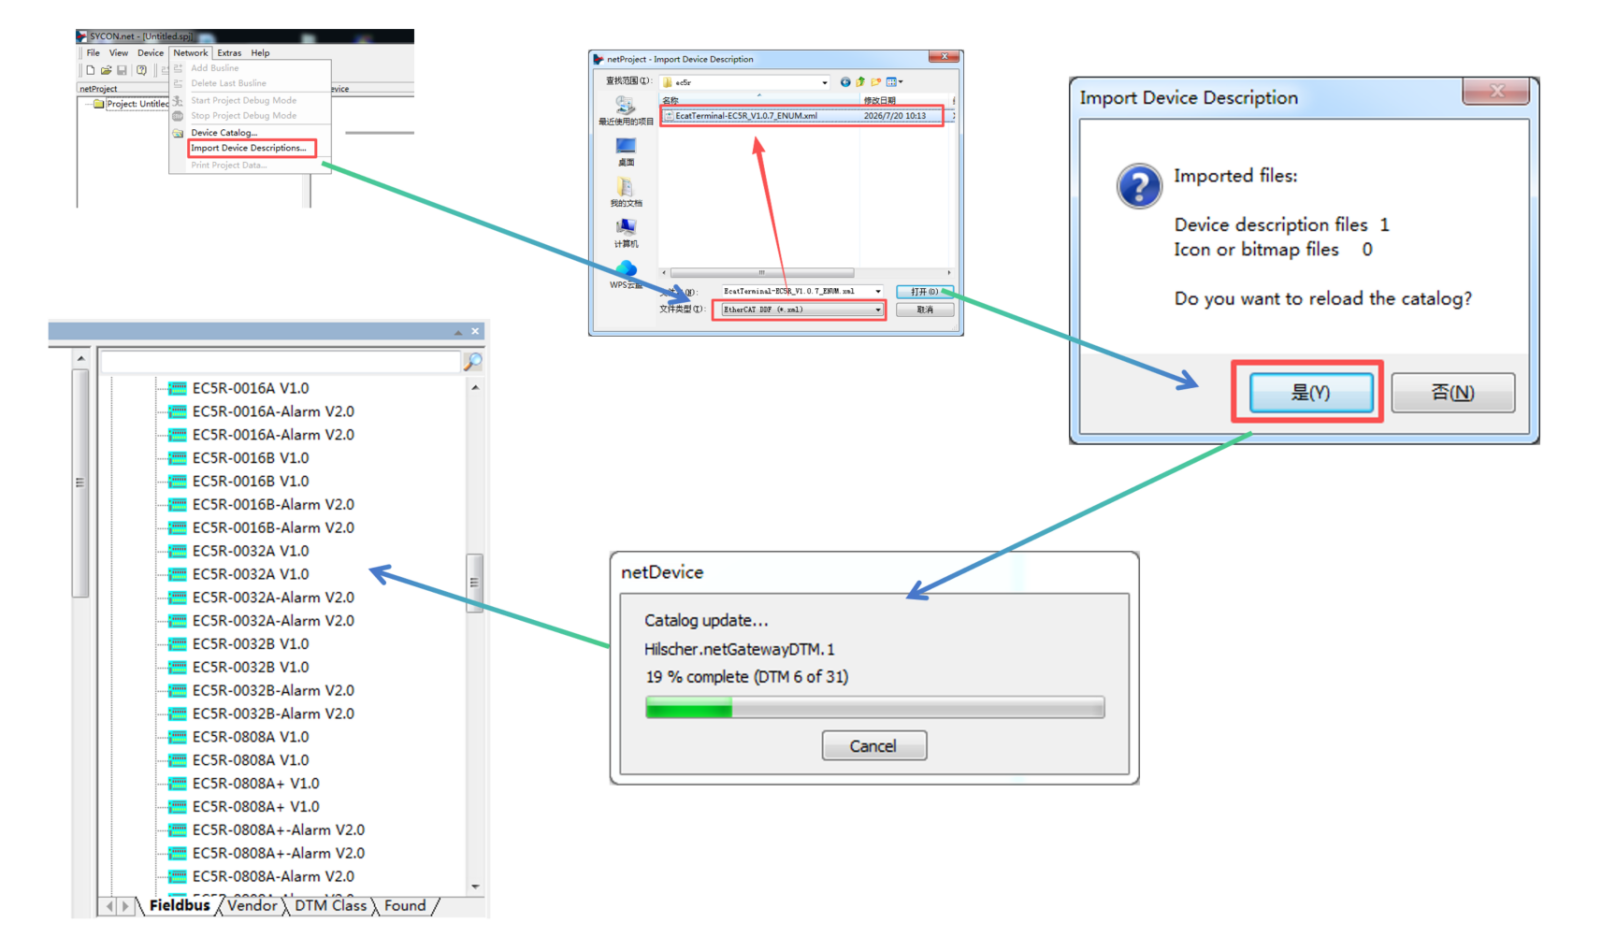
This means adding the ESI file (.xml file) of the slave to the device catalog. Click the menu bar [network] → [Import device Descriptions ... ] → select the.xml file → [Open] → [Yes]. The loaded slave can then be found in the device catalog on the right side of the interface. If the device catalog is not displayed on the right side, it can be opened from the menu bar under [network] → [device catalog ... ].
2. Add the CIFX board
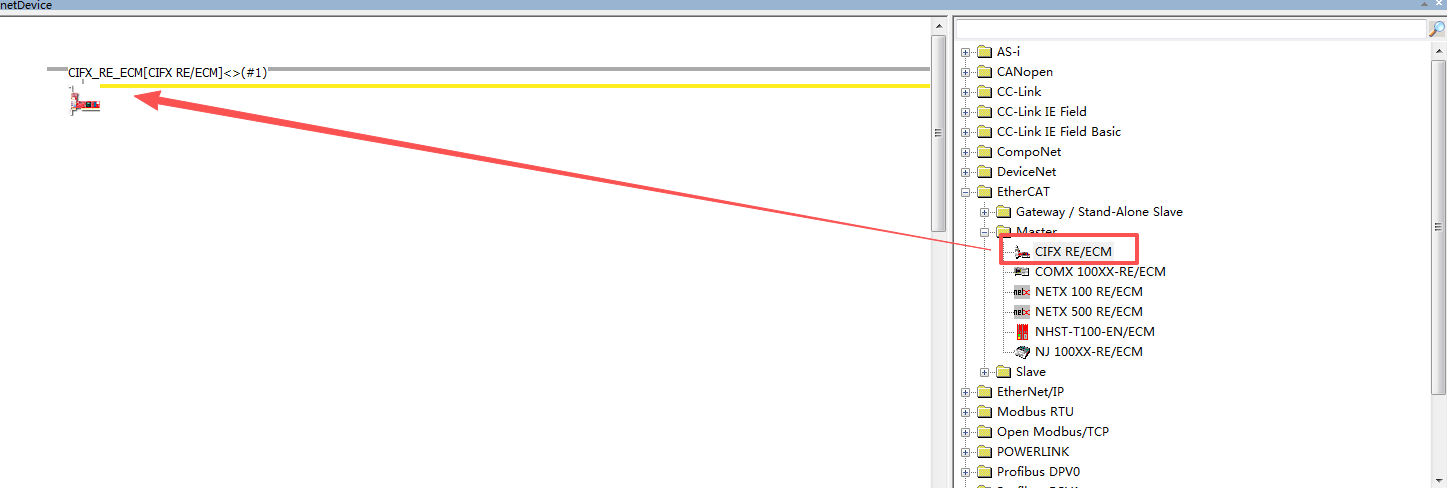
In the device catalog, find EtherCAT → master → CIFX RE/ECM, and drag the CIFX onto the gray line in the middle of the interface with the left mouse button.
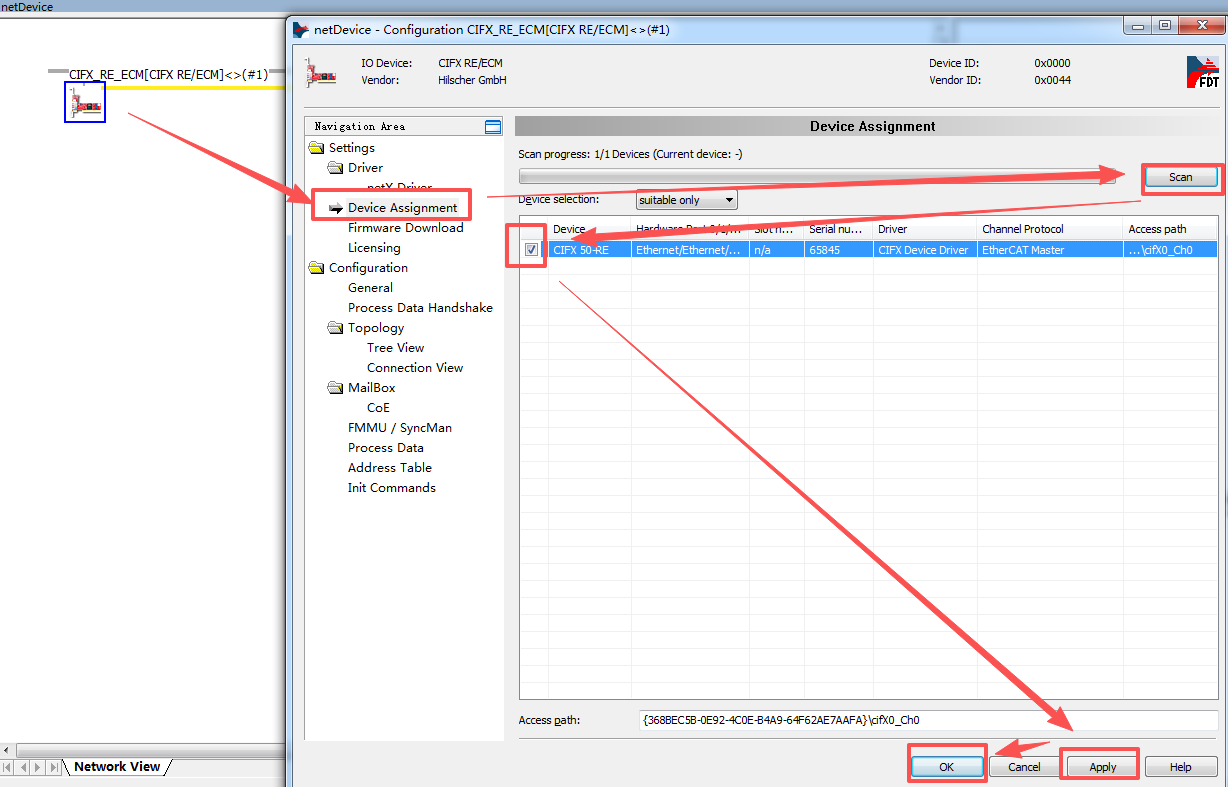
Double-click the dragged CIFX icon, or right-click the icon → [configuration] to open the configuration interface. Expand device Assignment → [scan], find the CIFX 50-RE and check it, then click [Apply] → [OK] to close the window.
3. Scan for slaves
Right-click the CIFX icon → [network scan] to scan for slaves. Note that before network scan, the slave should be powered on and connected to the CIFX board with an Ethernet cable (connected to the port near the Indicator).
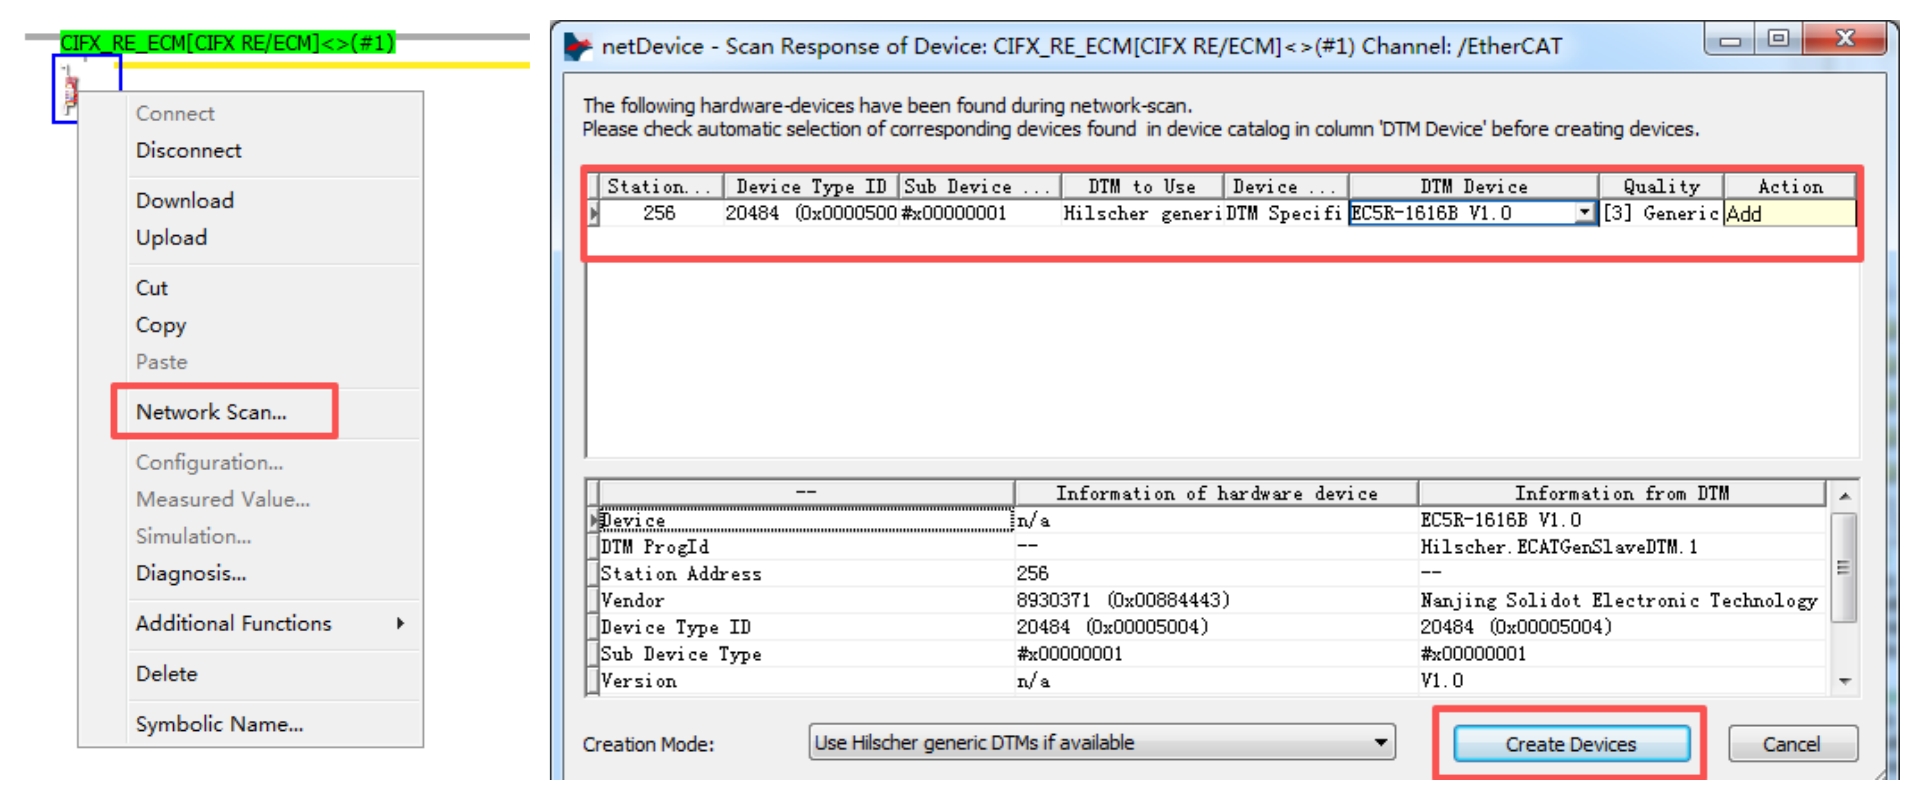
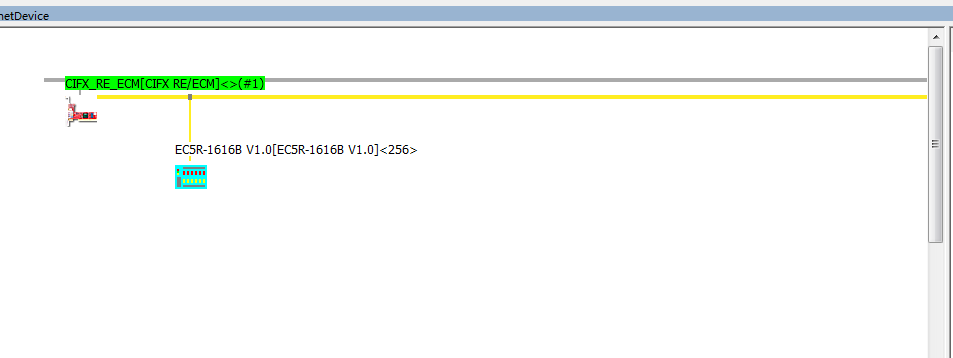
4. Master/slave EtherCAT configuration
Right-click the CIFX icon → [Disconnect], then double-click the CIFX icon to open the master configuration, where you can configure the master's Cycle time, Init state, Synchronous mode, communication trigger, watchdog, etc.
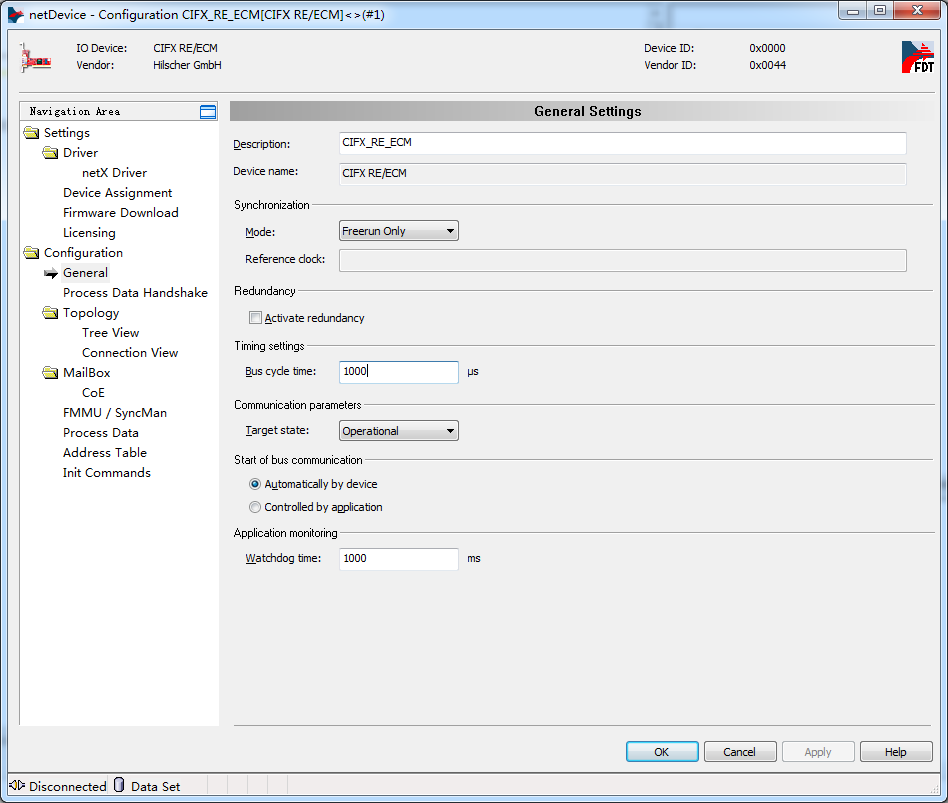
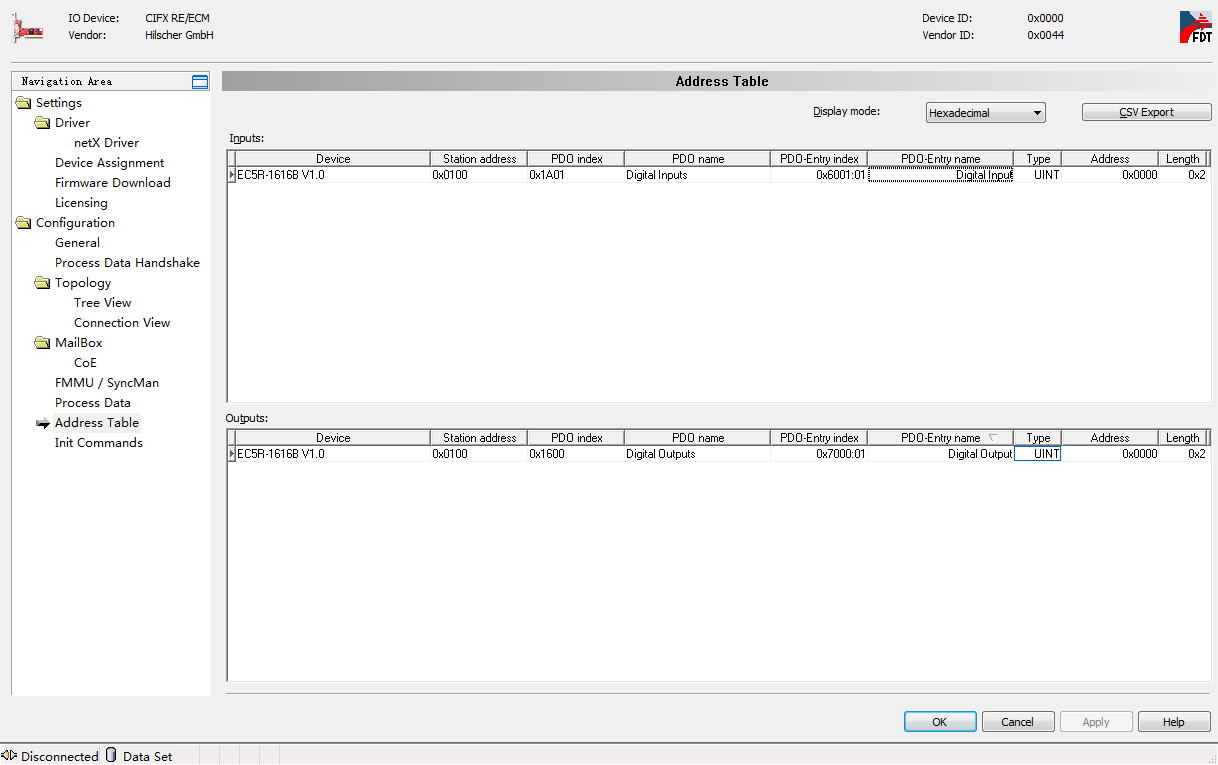
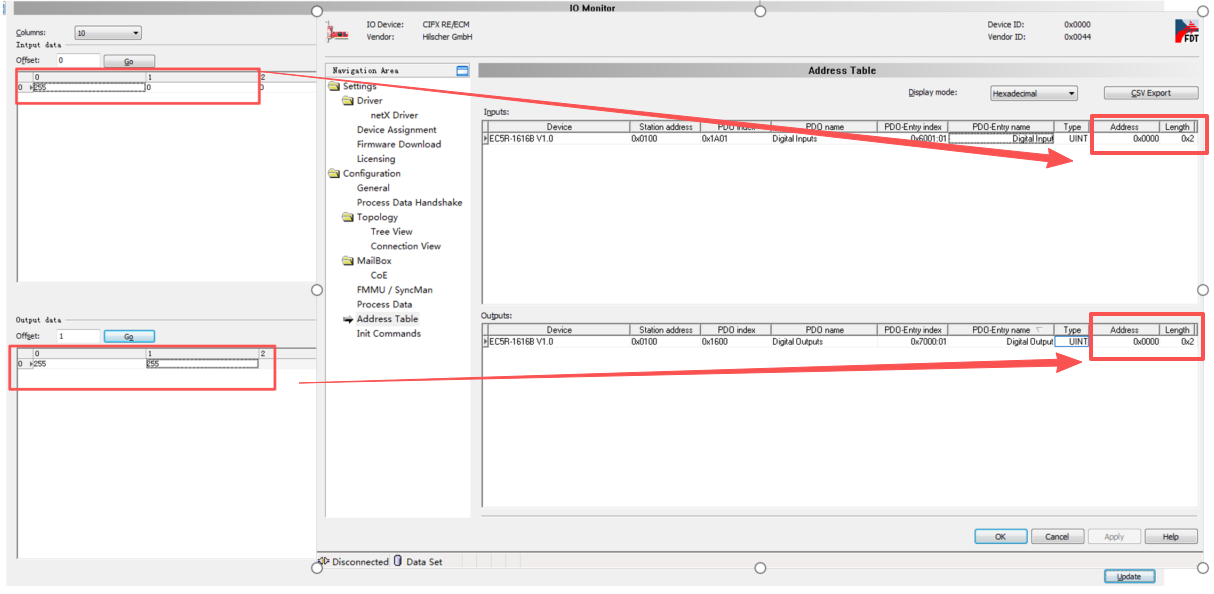
In addition, the network topology can also be viewed. The address table serves as the address for PI (process Image, i.e. real-time communication data) communication. The address table arranges the PI data of all slaves in the network in topology order, meaning that each PI data item of each slave has a unique address in the address table.
5. Download the configuration to the board
After the master/slave configuration is complete, right-click the CIFX icon → [download] to download the configuration information to the board. Alternatively, right-click → [Connect] first, then right-click → [download]. When the prompt appears, simply confirm the download. After the download is complete, the output Windows window at the bottom of the interface will indicate that the download is complete.
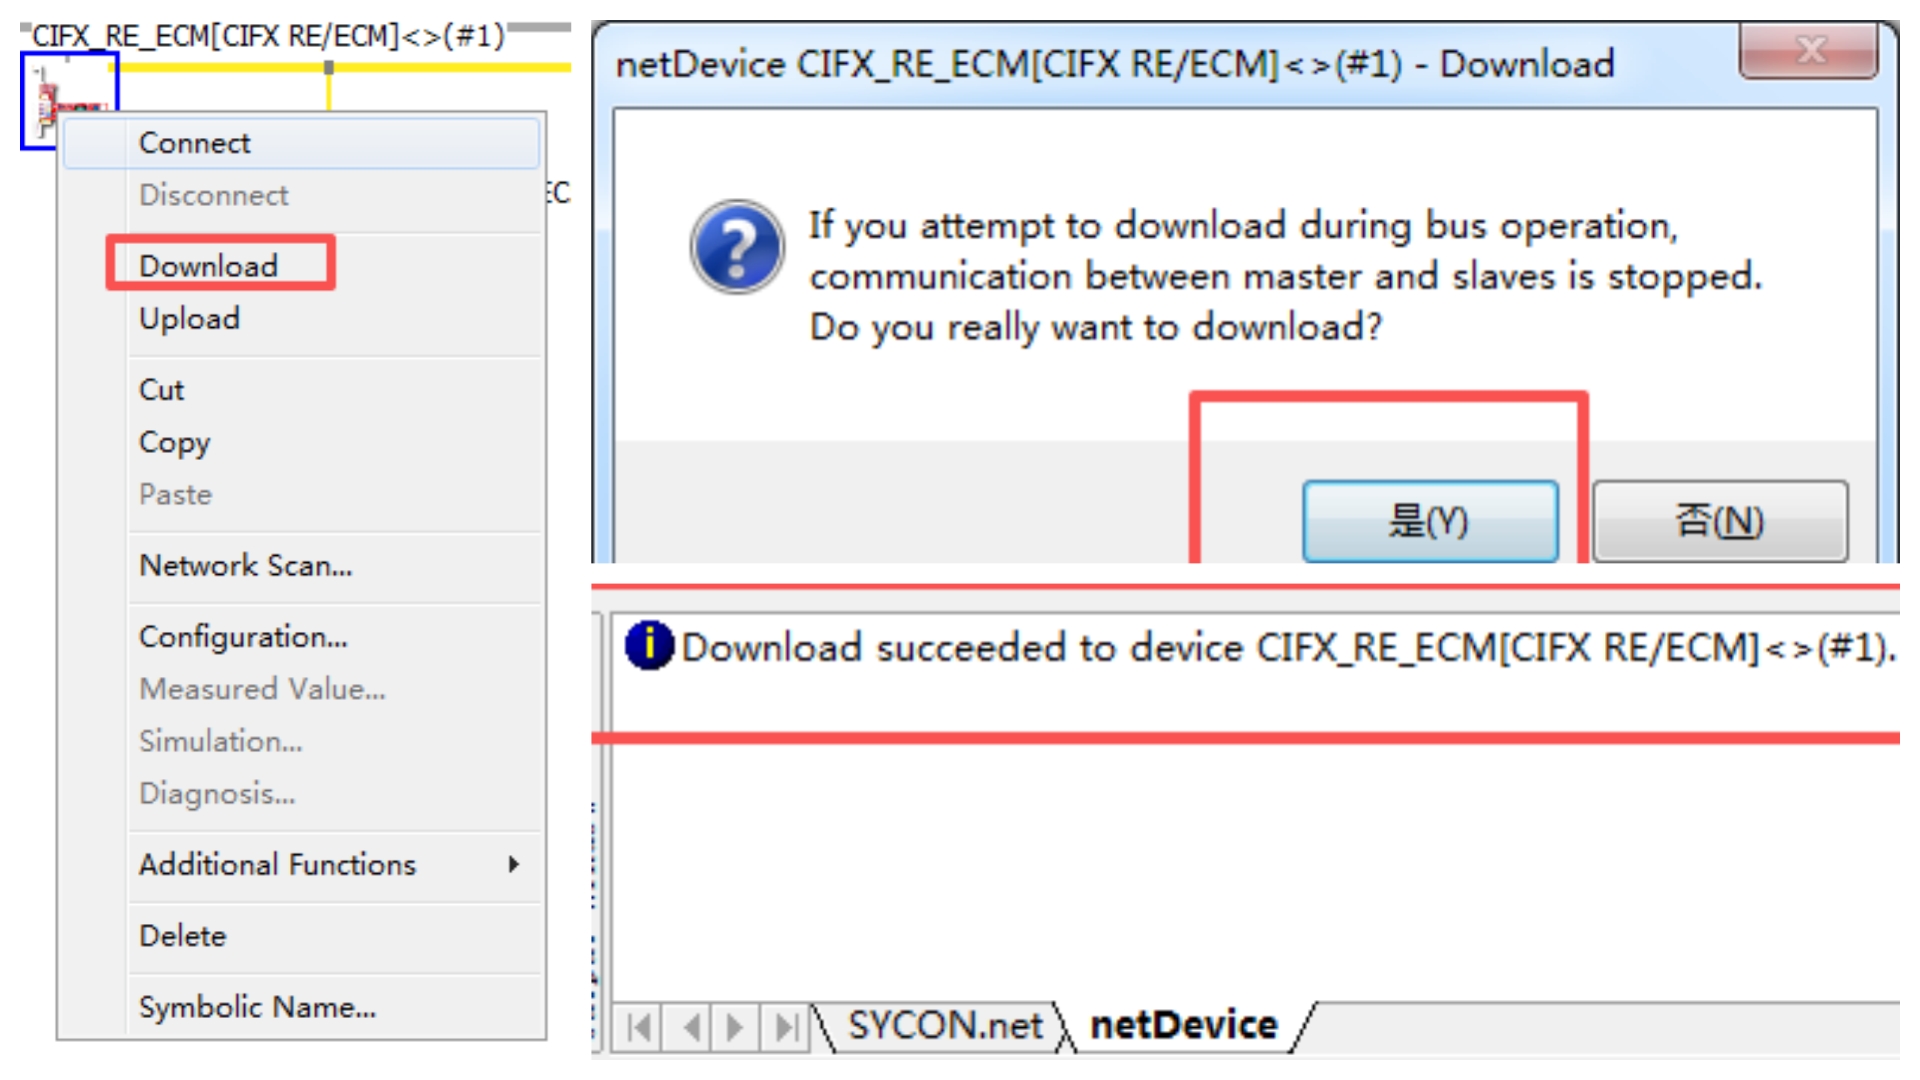
Important: The download step cannot be omitted. Any modification in SYCON.net only takes effect after it is downloaded to the board.
6. Status monitoring
After the configuration is downloaded, the board starts running according to the configuration. Right-click the CIFX icon and select [Connect], then right-click the CIFX icon and select [Diagnosis ... ] to monitor the board's operating status.
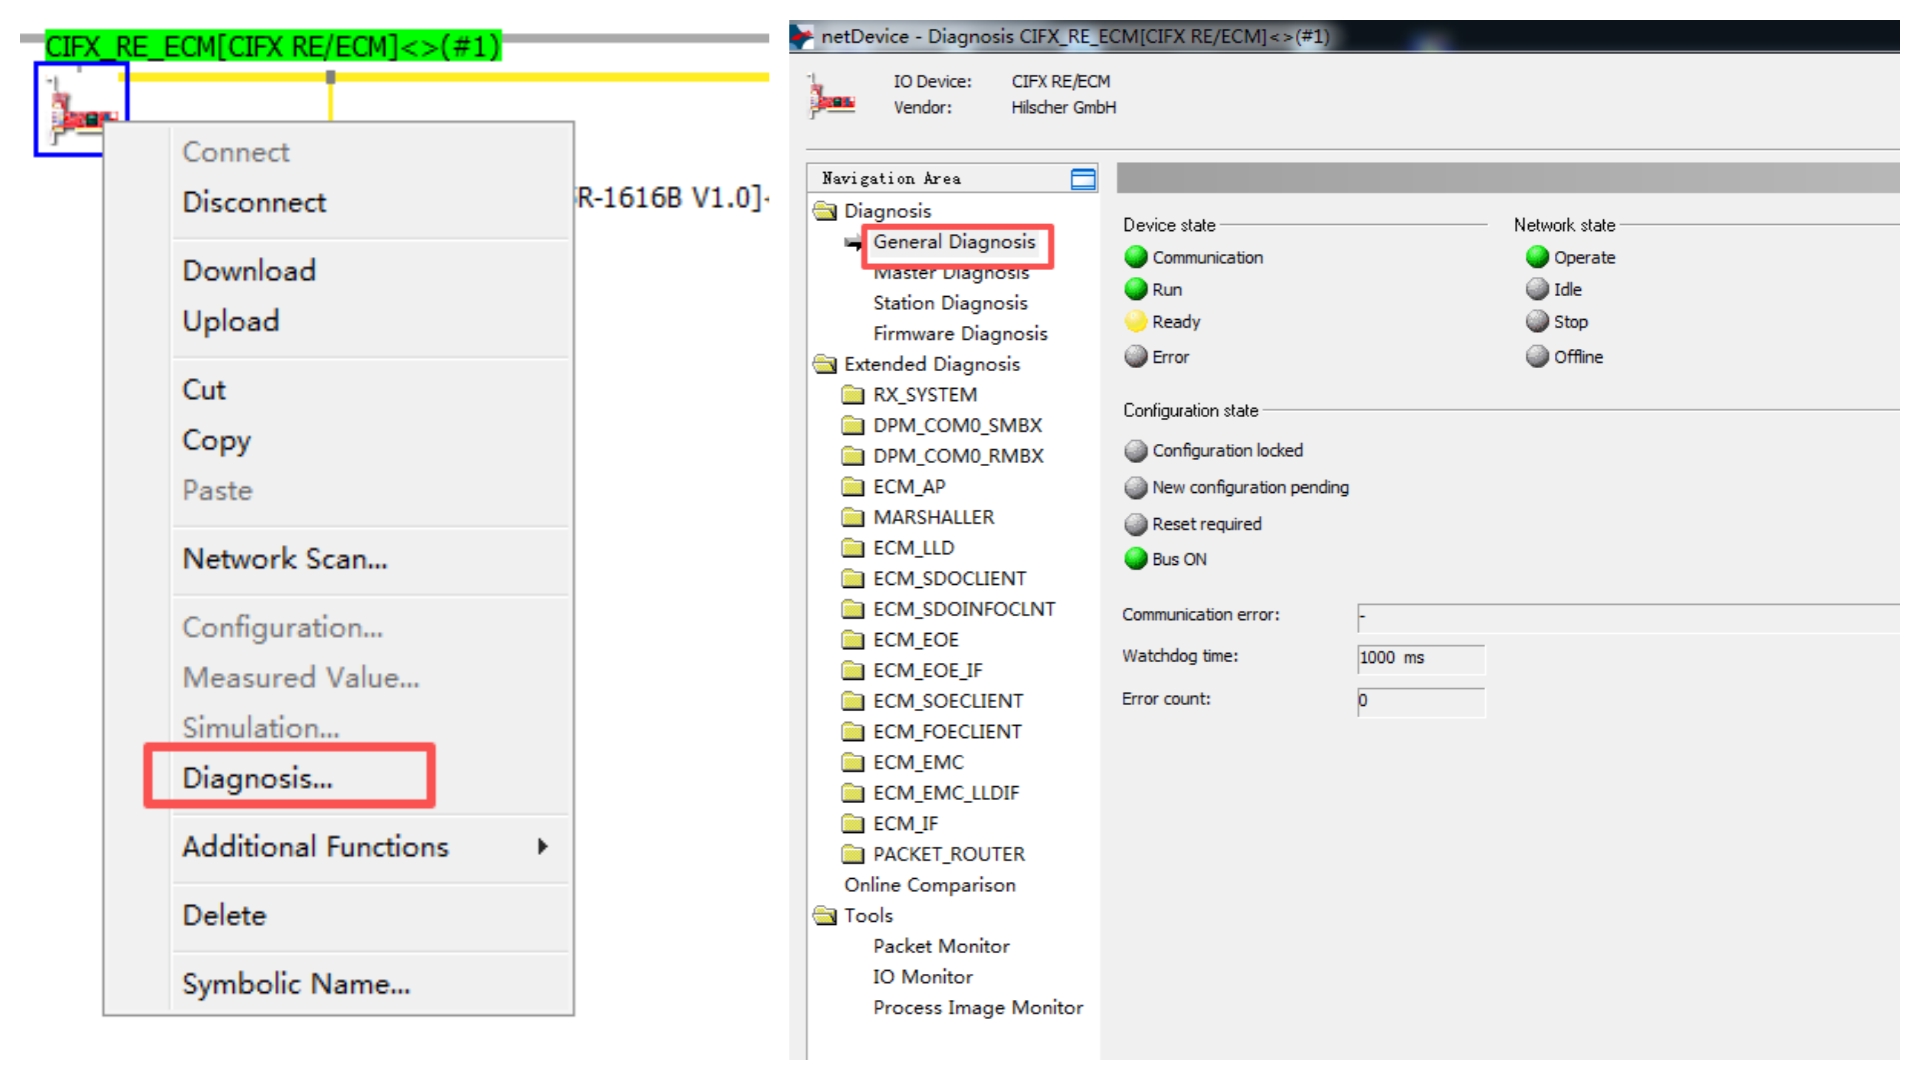
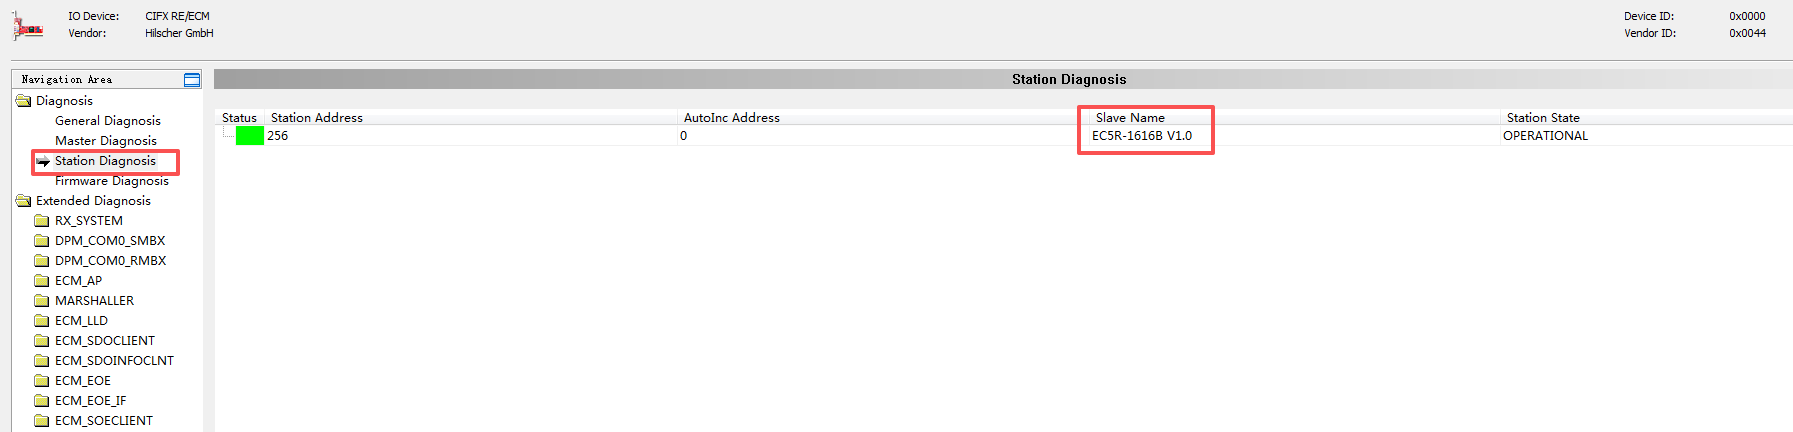
As shown, the board's current state is Communication+run, indicating that the board is running and performing data exchange normally. In addition, the network state is Operate, indicating that the network is already performing data exchange; when the network state is Idle, it indicates that the EtherCAT network is not in OP state. Click Station Diagnosis to check whether any slave is offline.
7. Data Exchange Test
After the board is running, go to [Diagnosis] → [Tools] → [IO Monitor]. You will also see an upper and a lower section. The upper section is input data, i.e. the data the master reads from the slaves; the lower section is output data, i.e. the data the master writes to the slaves.
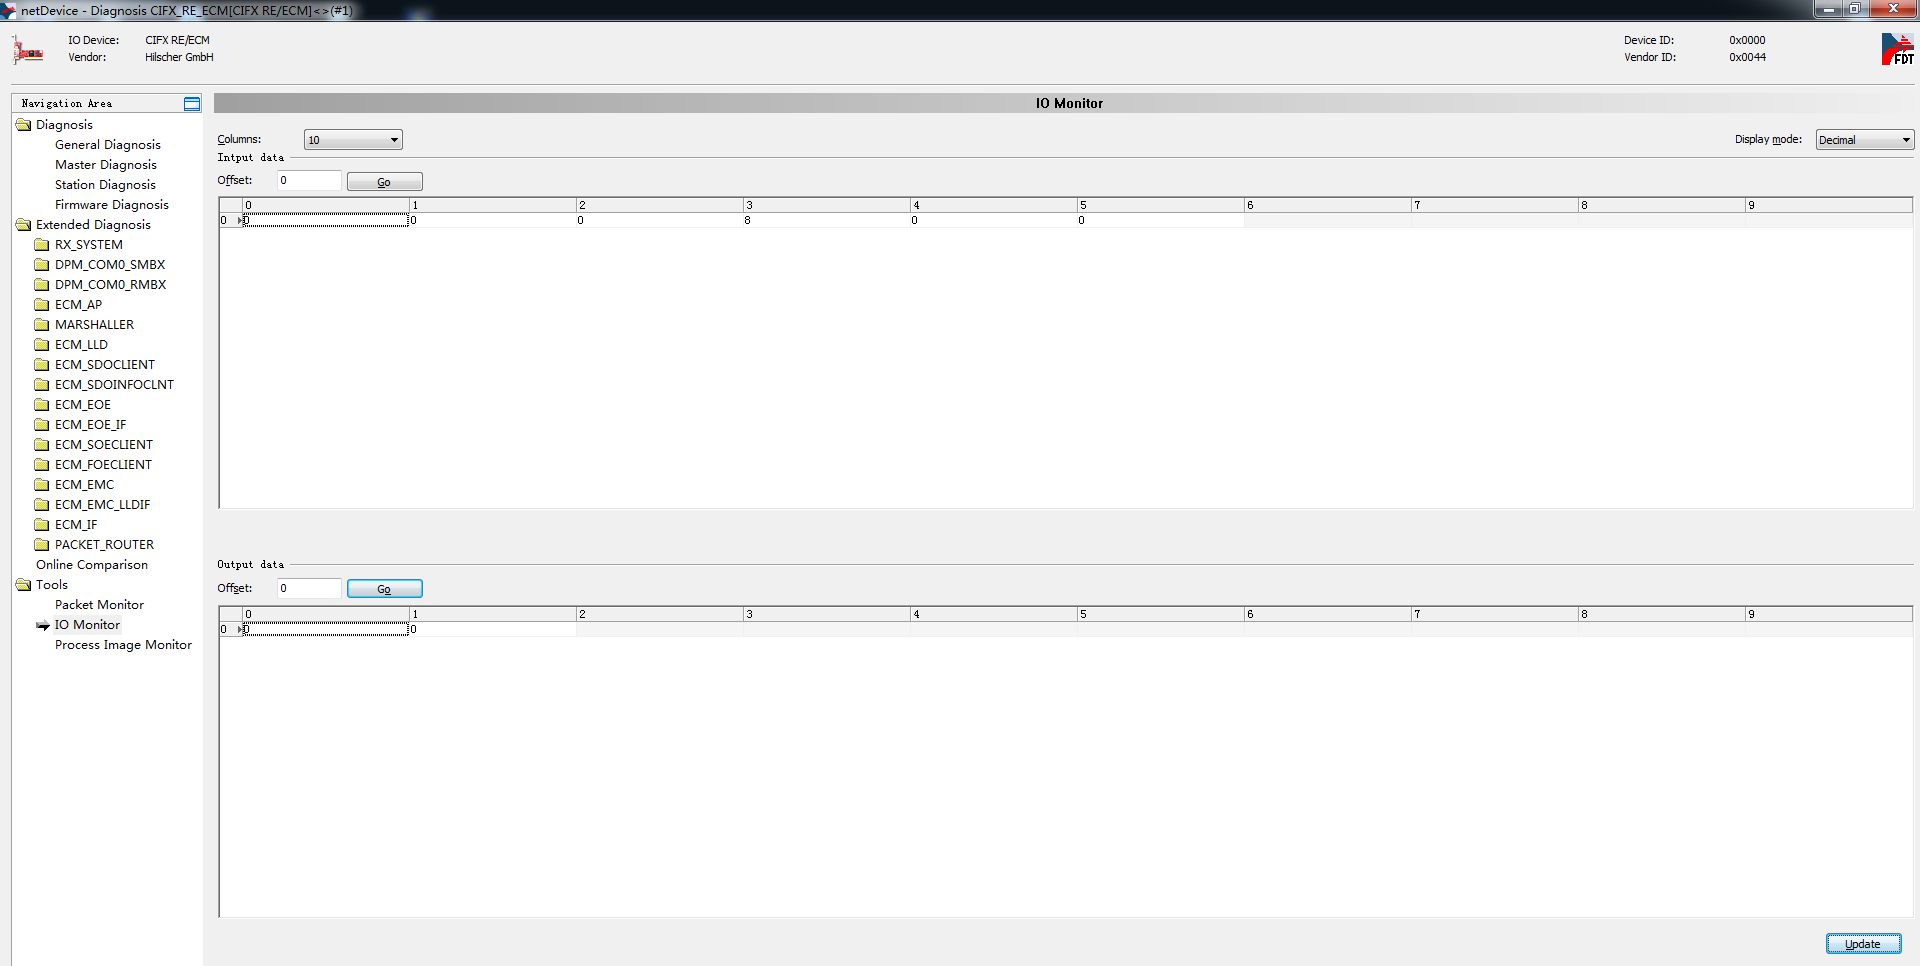
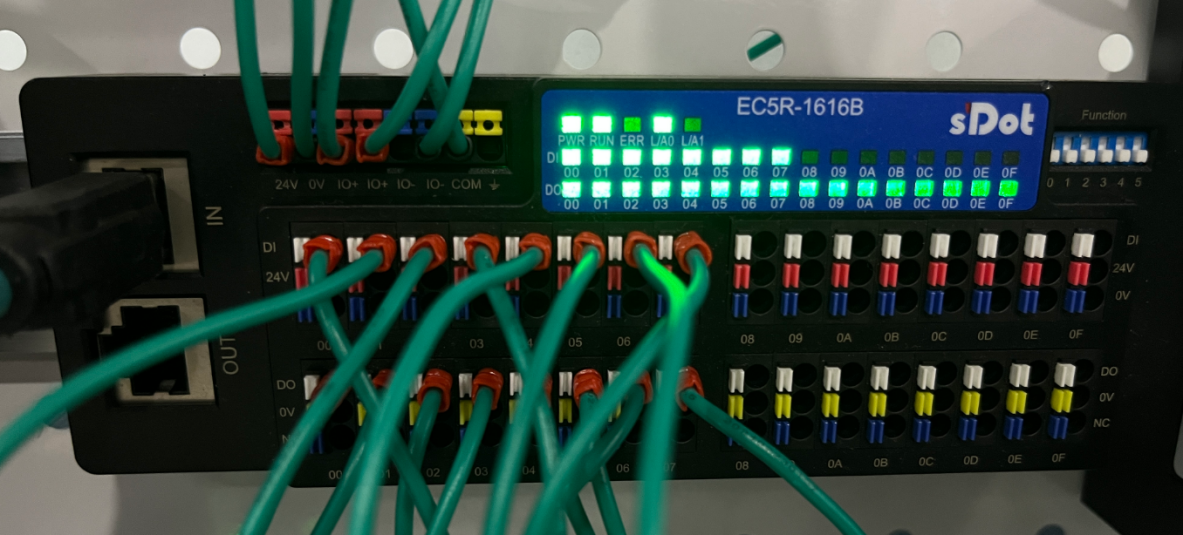
The EC5R-1616B has 16 DI channels + 16 DO channels. The first 8 DI channels are wired to the first 8 DO channels, so when the board sets the first 8 DO channels to 1, the first 8 DI channels also acquire a value of 1. In the first byte of output data in IO Monitor, enter 255, i.e. 0xFF, then click [Update]. You can see that the first byte of input is also updated to 255, indicating that the value 255 has been written from the board (master) to the module and the module's value has been returned to the board, and the corresponding I/O points on the I/O module are also lit.
The above is the complete procedure for configuring the EC5R-1616B on SYCON.net with the Hilscher CIFX 50-RE board. Keep three key points in mind for stable communication: first, power on the slave first and connect the Ethernet cable to the port on the CIFX board closest to the indicator; second, each PI data item in the address table has a unique address, which is the basis for reading and writing data; third, any modification in SYCON.net only takes effect after it is downloaded to the board.